In this article, I’m going to show you how to create cinematic images using a single prompt in MidJourney. This will be wonderful when it comes to referencing some of your favorite cinematic shots from well-known films or just creating cinematic images in general.
Exploring the Prompt Structure
Prompt: cinematic still of [subject] in/on/by/within/around [background and environment] film style of [cinematic film][Parameters]
Now we can copy this and paste it into MidJourney. Type in “/imagine” and then paste in that prompt.

Now, as you see right here, we have information that we can fill out. We have a subject that we need to fill out, we have a preposition that we need to choose from, a background and environment, and a certain film style that we need to copy or take inspiration from.
- Subject: This is the main focus of your image, such as a character or object.
- Preposition: Determines the relationship between the subject and the background/environment.
- Background/Environment: Sets the scene for your image.
- Cinematic Film Style: Inspires the overall look and feel of your image.
Selecting Prepositions and Backgrounds
And now I have to choose a preposition. So, how do I want the subject in relation to the background and environment?
Here’s where I pick that. I think I’m going to choose “on” for the preposition. You can think of your own.
It could be below something, above something, however you want the subject to be placed within the background and environment, that’s where you can choose that right there. It’s a pretty important word actually.
Read More: MidJourney V6 Aesthetics
Create Cinematic Image using MidJourney
Once you’ve chosen your components, it’s time to craft your cinematic image. Let’s walk through the process:
Step 1: Select Subject:
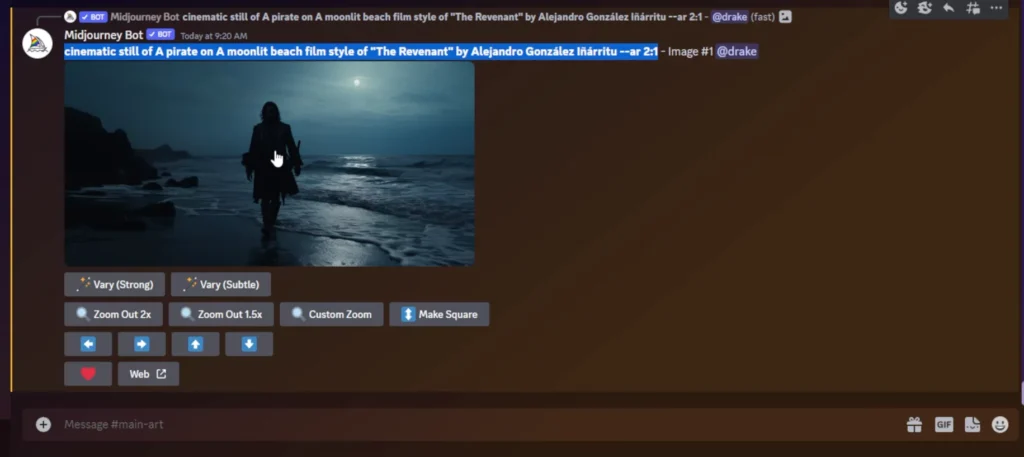
Browse through the database and choose a subject that resonates with your vision. For example, you might opt for a pirate for your first cinematic shot.
Step 2: Choose Preposition:
Decide how you want your subject to interact with the background/environment. Options include “on,” “below,” “above,” and more. For our pirate example, placing them “on” a moonlit beach sets the scene.
Step 3: Pick a Cinematic Film Style:
Select a film style that aligns with the mood and atmosphere you want to convey. For instance, the cold, blue hues of “The Revenant” could add a dramatic touch to your pirate image.
Step 4: Adjust Parameters (Optional):
Depending on your preference, you can tweak parameters such as aspect ratio to further refine your image.
Step 5: Review and Save:
Once you’re satisfied with your choices, send off the prompt and watch as Mid Journey works its magic. Review the results and save your masterpiece.
Evaluating the Outcome:
I usually only change the aspect ratio because I think Majority does a pretty good job otherwise.
So, I’m going to make an aspect ratio of 2:1. So, it’s a nice rectangle wide shot with a very open field of view.

And just like that, we have our first prompt done and now we can send it off and look at the result. So, if you’re struggling to generate ideas or you just need some inspiration on what to do then you can go over there and check out some of those elements.
- 10 Midjourney V8 Tips to Enhance Your Results Fast | Prompting, SREF codes
- Midjourney v8 vs Nano Banana 2 vs Seedream 5.0 Lite
- How to Personalize Your Midjourney Profile: Beginner to Advanced Guide
- Midjourney V8 ALPHA: Key Insights, Challenges, and Upcoming Features
- Midjourney V8: A Comprehensive Comparison You Need to See
Demi Franco, a BTech in AI from CQUniversity, is a passionate writer focused on AI. She crafts insightful articles and blog posts that make complex AI topics accessible and engaging.